7. Receiving Faxes
This section explains how the Fax service handles
incoming faxes and shows you how to view those faxes when they’re
sitting in your Inbox.
Answering Calls Automatically
Enabling the Automatic Answer option is the easiest way to handle incoming calls.
In this mode, the Fax service constantly polls the modem’s serial port
for calls. When it detects a call coming in, it waits for whatever
number of rings you specified (which can be as few as one ring or as
many as 99) and then leaps into action. Without prodding from you,
Automatic Answer answers the phone and immediately starts conversing
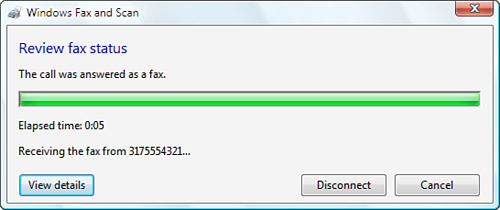
with the remote fax machine. To follow the progress of the transfer, in
the Fax and Scan window, select Tools, Fax Status Monitor to open the
Fax Status Monitor window, as shown in Figure 3.
Answering Calls Manually
If you work with Fax and Scan in manual mode, when a
call comes in you hear a ringing tone, and the taskbar’s notification
area pops up a message that says Incoming call from fax, where fax is the Called Subscriber ID (CSID) of the remote fax. To answer the call, you have three choices:
- Click the taskbar message.
- In Windows Fax and Scan, either select Tools, Receive a Fax Now or click the Receive a Fax Now toolbar button.
- If you happen to have the Fax Status Monitor open already, click the Answer Call button.
This mode is ideal if you receive both voice calls
and fax calls on the same phone line. Here’s the basic procedure you
need to follow for incoming calls:
1. | When the phone rings, pick up the receiver.
| 2. | If
you hear a series of tones, you know that a fax is on its way. In this
case, click the notification message or the Answer Now button, as
described earlier.
| 3. | Fax
and Scan initializes the modem to handle the call. Wait until the Fax
and Scan reports the call was answered as a fax in the Fax Status
Monitor window, and then hang up the receiver. If you hang up before you
see this message, you disconnect the call.
|
Working with Received Faxes
Depending on the size of the fax transmission, the
Fax service takes from a few seconds to a few minutes to process the
data. Eventually, though, your fax appears in the Inbox. From there, you
can perform the following chores:
Read the fax—
Double-click the fax in the Fax Console’s Inbox folder (or select the
fax and then select File, View). This launches the Windows Picture and
Fax Viewer, which displays your fax and enables you to annotate it. Print the fax— Select the fax, and then select File, Print. Send a reply to the fax sender—
Select the fax, and then select Document, Reply (or click the Reply
button). Fax and Scan creates a new fax message with the sender added to
the To box. Forward the fax to another fax number— Select
the fax, and then select Document, Forward (or click the Forward
button). Fax and Scan creates a new fax message with the fax as an
attachment. Save the fax as an image—
Select the fax, and then select File, Save As. Use the Save As dialog
box to choose a name and location for the file, and then click Save.
Note that the fax is saved as a TIF image. Email the fax as an attachment— Select the fax, and then select File, Mail To. Use the New Message window to set up the email message, and then click Send. Delete the fax— Select the fax, and then select File, Delete (or just press the Delete key).
Routing a Received Fax
One of the nice features in Windows Home Server’s
version of the Fax service is that you can configure it to automatically
route all incoming faxes to an address you specify. Here are the steps
to follow to set this up:
1. | Open the Fax Service Manager.
| 2. | Open
the Devices and Providers, Devices branch, open your modem branch, and
then click Incoming Methods. You see three methods in the list:
| Route Through E-Mail | This
is the method we’ll use here to send incoming faxes to an email
address, as described in the rest of the steps in this section. | | Store in a Folder | Use
this method to have Windows Home Server store a second copy of each fax
in the folder that you specify. (You may have done this earlier; see “Configuring the Fax Modem.”) To change the folder, double-click this method and use the text box in the Store in Folder tab. | | Print | Use
this method to have Windows Home Server automatically print any
received fax. Double-click this method, display the Print tab, and use
the Printer Name list to choose the printer you want to use. |
Tip
If you want others to have access to the incoming faxes, create a subfolder called, say, Faxes in Windows Home Server’s Public
shared folder. For this to work, you also need to add permissions for
the Network Service, which is the system account that the Fax service
uses. Right-click the new Faxes folder, click Sharing and Security, and then display the Security tab. Click Add, type Network Service
in the Select Users or Groups dialog box, and then click OK to return
to the Security tab. Click Network Service, and click Full Control under
the Allow column. Click OK. You can now specify the \\Server\Public\Faxes folder in the Store a Copy in a Folder text box.
| 3. | Double-click the Route Through E-Mail method.
| 4. | Display the E-Mail tab, type an address in the Mail To text box, and then click OK.
| 5. | In the tree pane, right-click the Fax (Local) item at the top of the tree, and then click Properties.
| 6. | Display the Receipts tab, shown completed in Figure 4.
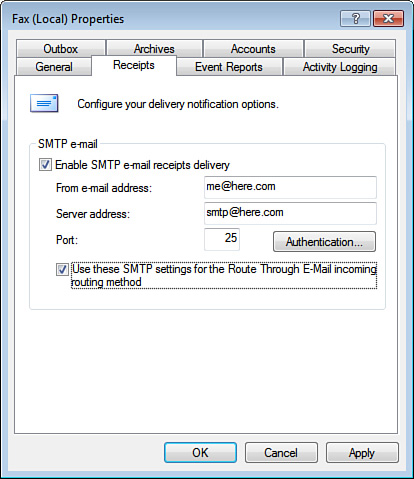
| 7. | Activate the Enable SMTP E-Mail Receipts Delivery check box.
| 8. | Fill
in the fields for From E-Mail Address and the Server Address, which is
the domain name of your ISP’s or email host’s SMTP server.
| 9. | If your ISP or host requires you to use a port other than 25 for outgoing mail, enter that port number in the Port text box.
| 10. | If
your ISP or host requires authentication for outgoing mail, click
Authentication, activate the Basic Authentication option, click
Credentials, and then enter the username and password (twice) that you
use to authenticate outgoing mail. (On most systems, this is the same as
the login credentials you use for incoming mail.) Click OK until you
return to the Microsoft Fax Service Manager.
| 11. | Right-click the Route Through E-Mail method, and then click Enable.
| 12. | Activate the Use These SMTP Settings for the Route Through E-Mail Incoming Routing Method check box.
| 13. | Click OK.
|
Now when a fax comes in, the Fax service will use the
address you specified in step 8 to send the fax as an attachment to the
address you specified in step 4.
|